Garlic Chicken and Gnocchi — a happy blend of cooking, recipes, bon apetit
Bright, simple, all-in-one weeknight dinner
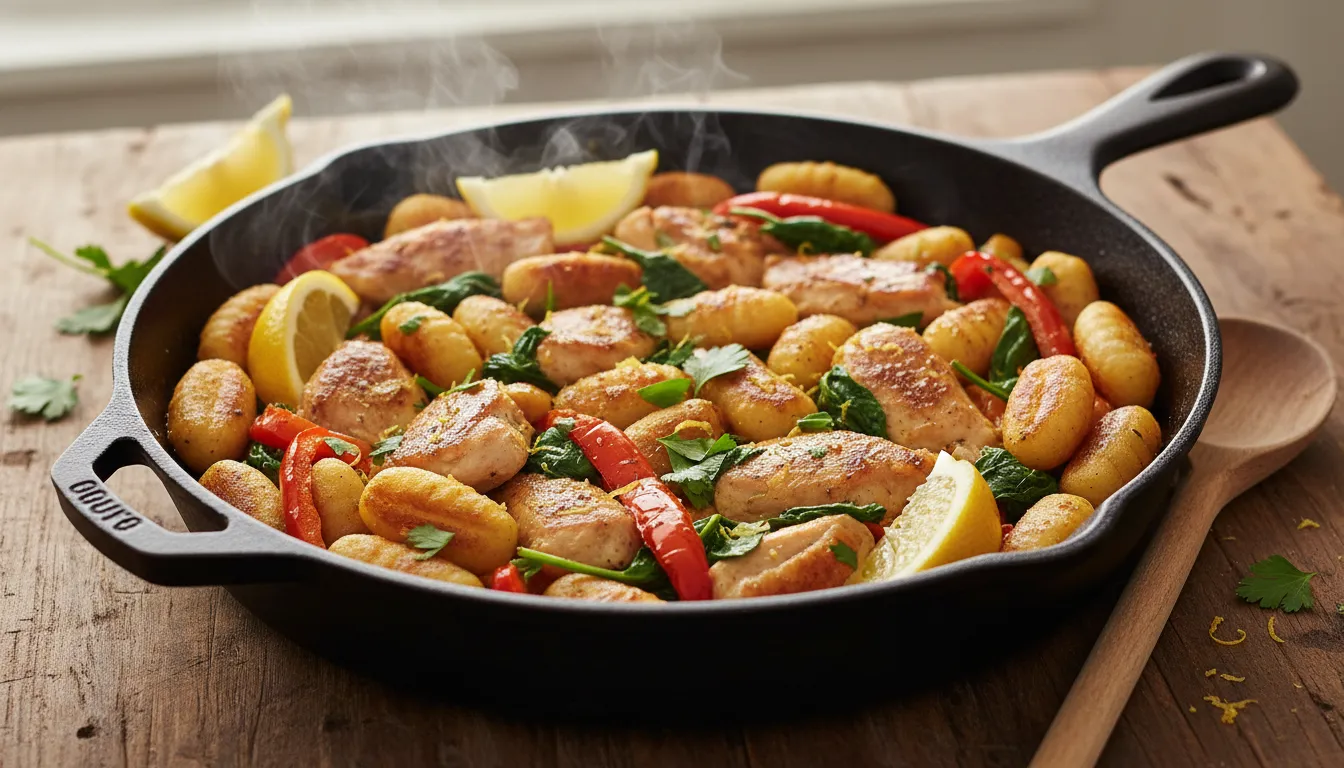
This garlic chicken and gnocchi recipe is an easy, flavor-forward meal that feels special without fuss. It pairs tender, seasoned chicken with seared gnocchi, sautéed vegetables, roasted red peppers, and a lemon finish for a bright pop. The post is perfect for anyone who loves cooking, recipes, bon apetit moments that come together quickly and taste like restaurant quality at home.
Key takeaways
- One-skillet friendly: Most of the dish finishes in a single large skillet for easy cleanup.
- Fast prep: Diced chicken and quick-cook packaged gnocchi keep total time under 30 minutes.
- Fresh finish: Lemon zest and juice lift the whole dish for a lively finish.
- This recipe is a delightful example of cooking, recipes, bon apetit made simple and satisfying.
Ingredients
- 1 to 1.5 lb diced chicken (1/2 inch or 1 inch cubes)
- 1 white or yellow onion, diced
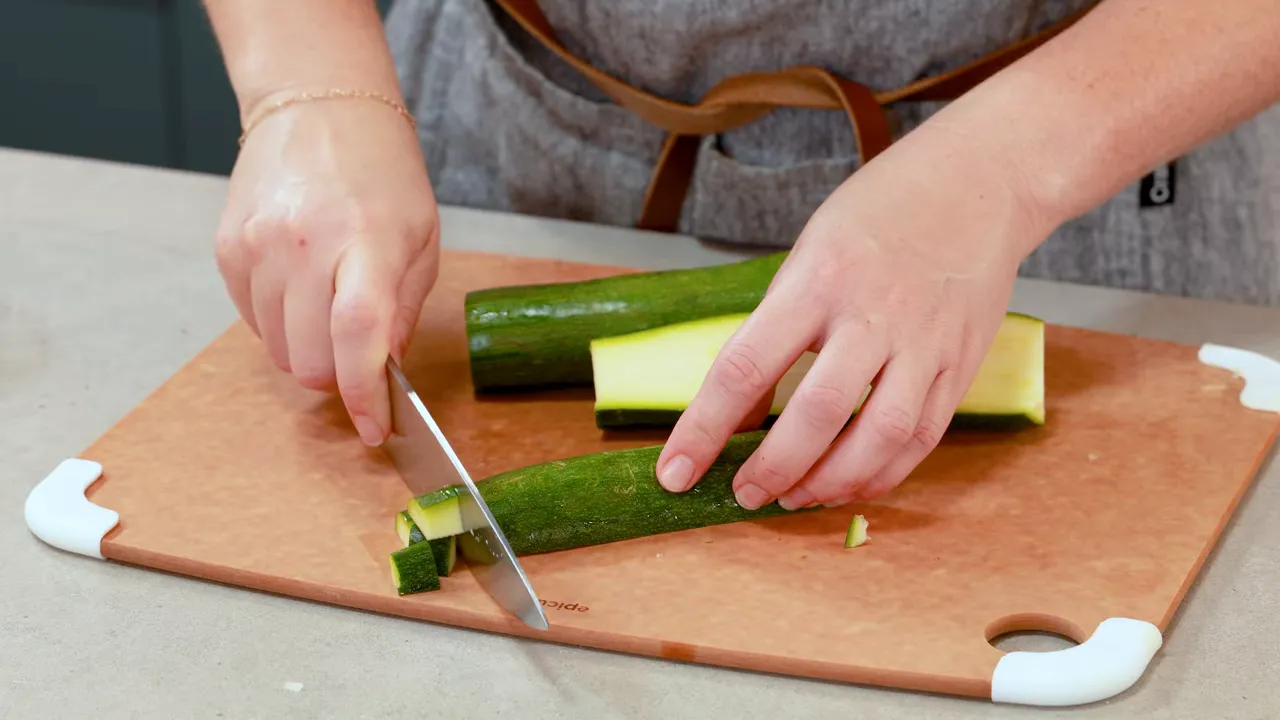
- 2 zucchinis, cut into bite-sized pieces
- 8 oz mushrooms, sliced or quartered
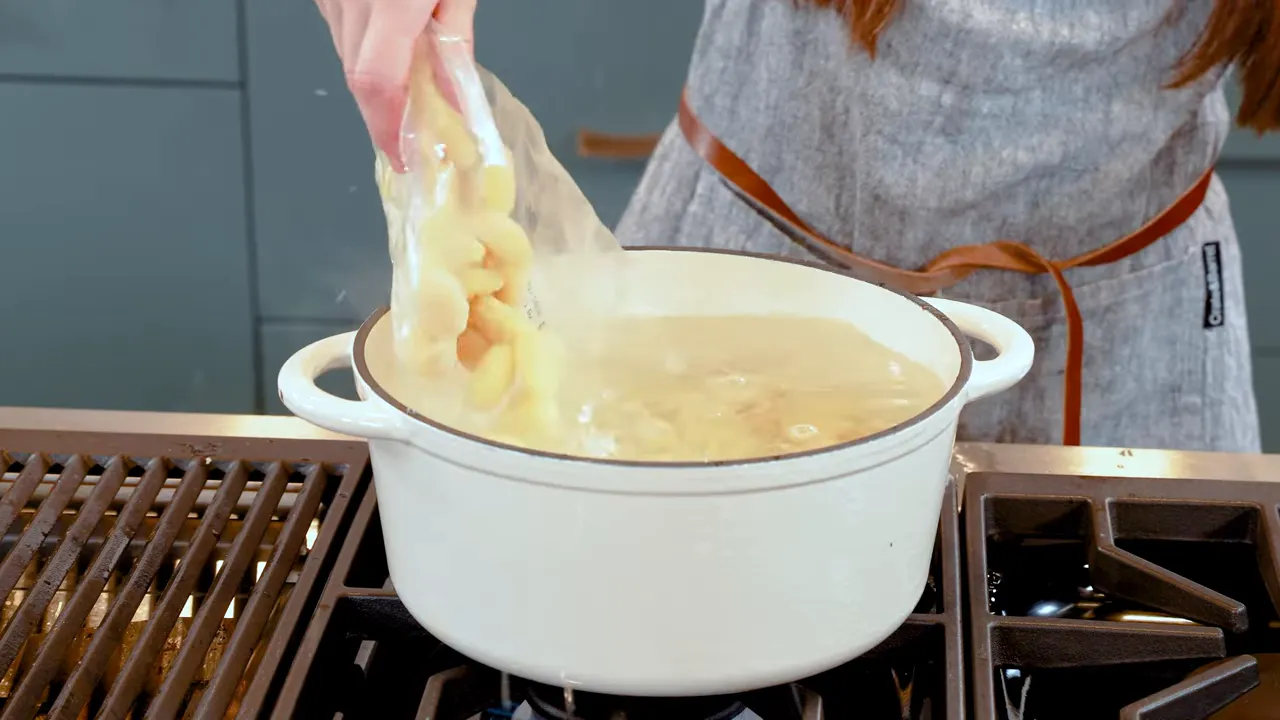
- 2 lb packaged dried gnocchi
- 8 oz jarred roasted red peppers, drained and chopped
- 2 cups loosely packed baby spinach
- 4 tbsp salted butter, plus another 4 tbsp later
- 1 tbsp olive oil
- 1 tbsp minced garlic
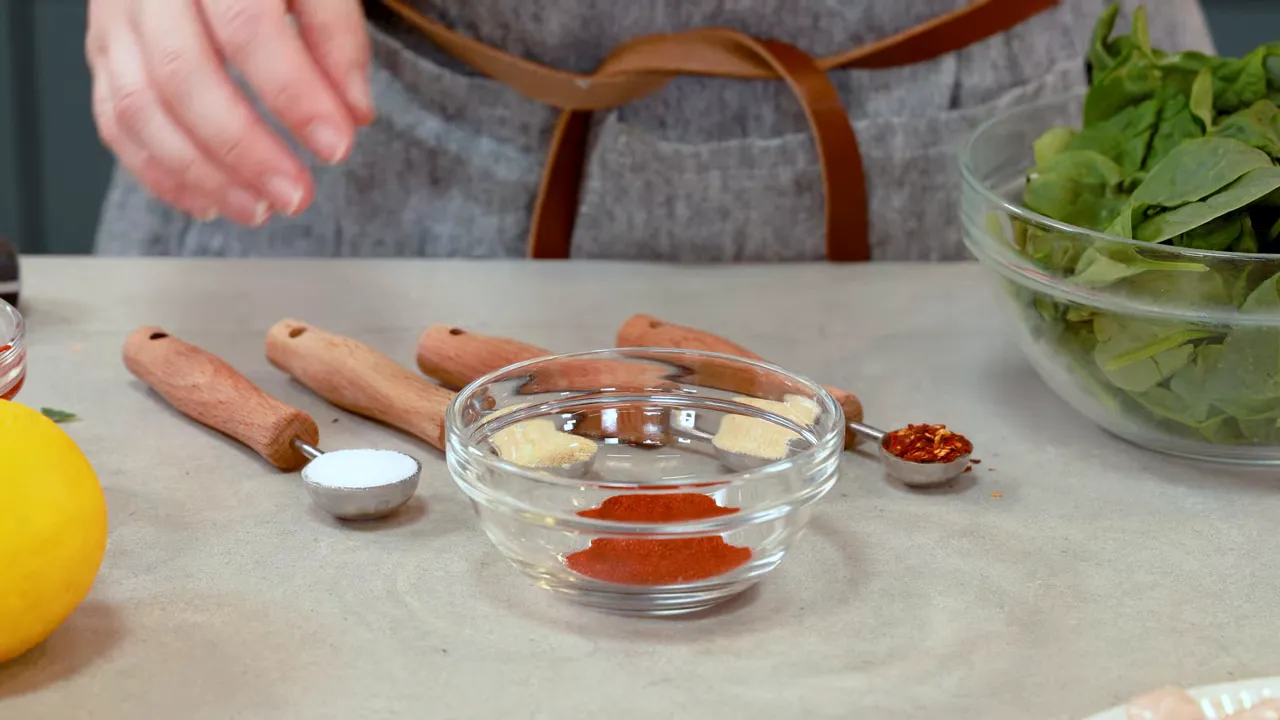
- Seasoning mix: 1.5 tsp paprika, 1 tsp salt, 1 tsp garlic powder, 1 tsp onion powder, 1/2 tsp crushed red pepper flakes, 1/4 tsp black pepper
- 1 lemon for zest and juice
Step-by-step method
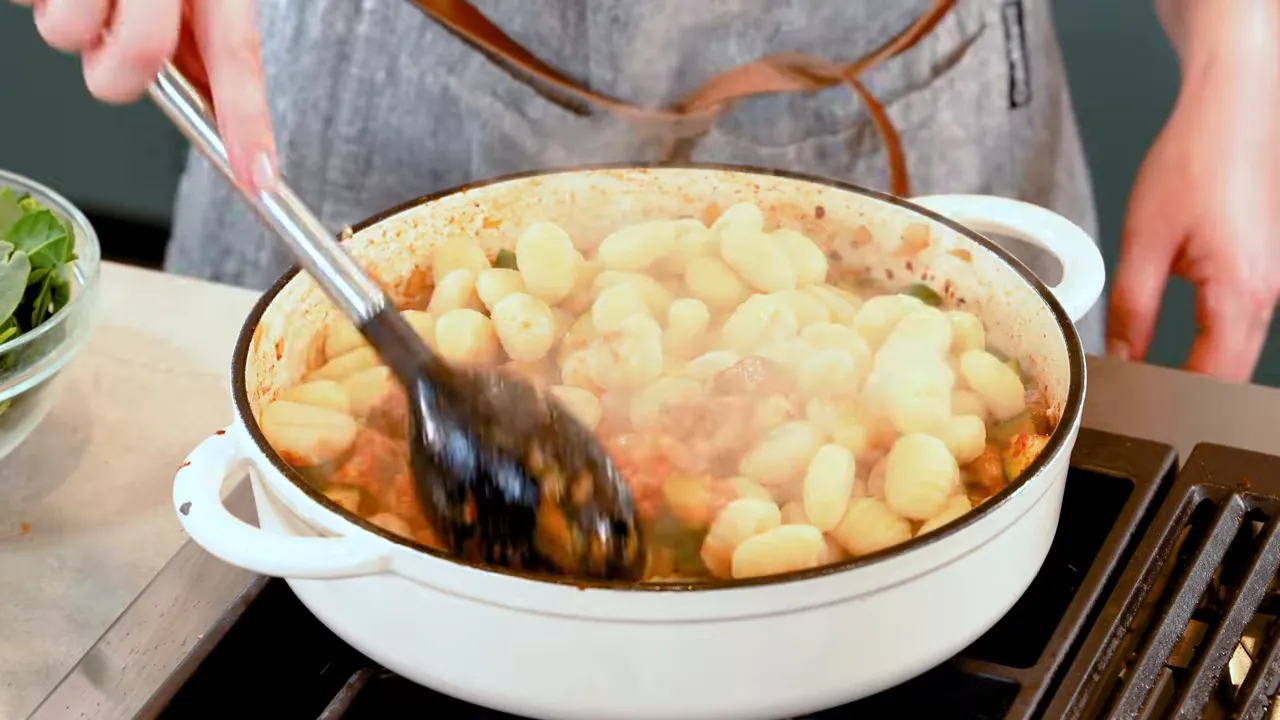
- Heat a large 12-inch skillet over medium high heat and add 1 tablespoon olive oil. Toss the diced chicken with about half of the seasoning mix and brown until cooked through, about 5 to 9 minutes depending on piece size. Remove and set aside.
- In the same skillet, melt 4 tablespoons salted butter. Add the onion, zucchini, and mushrooms and sauté until softened, about 5 to 7 minutes.
-
While the vegetables cook, bring a large pot of water to a boil and cook the packaged gnocchi for 2 to 3 minutes. Drain well.
- Add 1 tablespoon minced garlic and the remaining seasoning mix to the vegetables. Cook briefly for 60 to 90 seconds to bloom the spices.
-
Stir in another 4 tablespoons salted butter and add the drained gnocchi to the skillet. Sear the gnocchi for 3 to 4 minutes so little golden bits form.
-
Return the cooked chicken to the pan along with the roasted red peppers and baby spinach. Stir until the spinach just wilts, about 1 to 2 minutes.
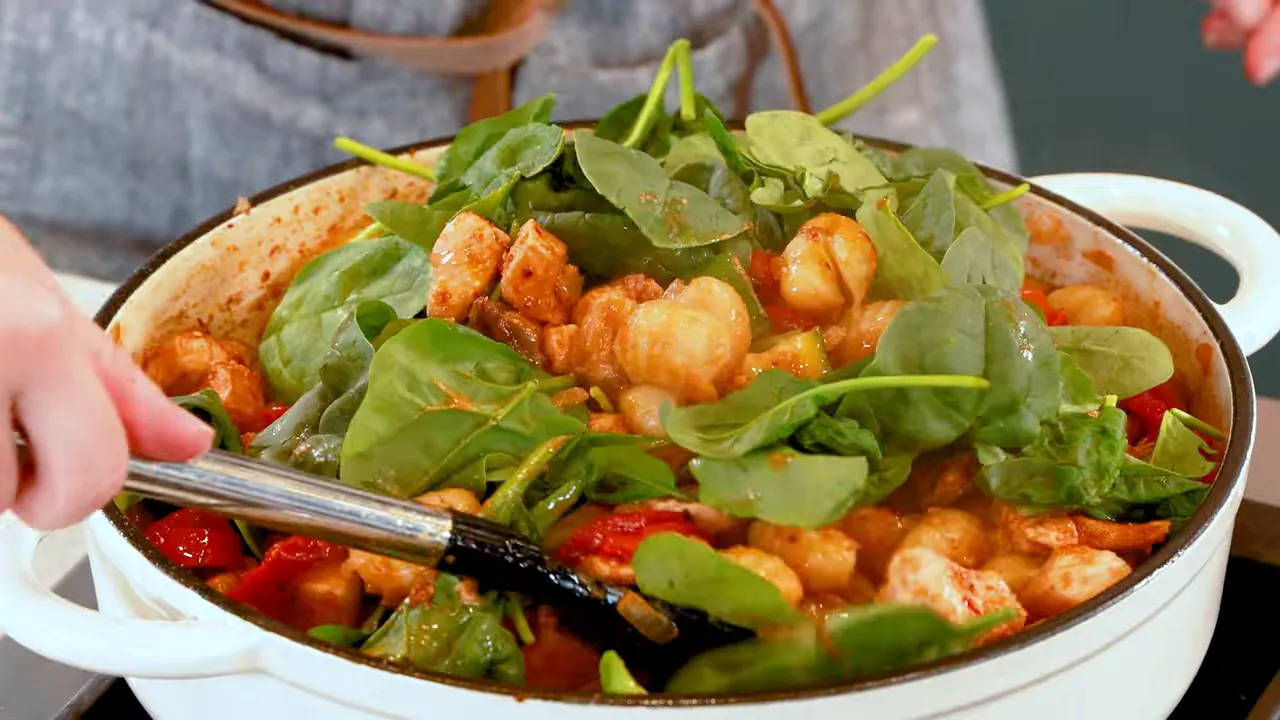
- Turn off the heat. Zest the lemon over the skillet, then juice it and pour about 1/4 cup lemon juice over everything. Give a final stir to combine and serve warm.
Why this version works
The combination of seared gnocchi and browned chicken adds texture contrast. Butter and garlic deliver comforting savory richness while roasted red peppers and fresh lemon add sweetness and brightness. The seasoning blend is simple and balanced, and spinach finishes the dish with color and a fresh note.
Quick tips for success
- Prep first: Having all vegetables chopped and spices measured prevents overcooking and keeps timing tight.
- Don't overcrowd: If the skillet is too full when searing gnocchi, finish in the pasta pot used to boil it.
- Swap-ins: Use chicken thighs for extra juiciness or swap zucchini for asparagus when in season.
- This recipe is a lovely example of cooking, recipes, bon apetit made approachable for everyday meals.
Serving and storage
Serve this dish with a light side salad or garlic bread for a fuller meal. Leftovers refrigerate well in an airtight container for up to 3 days. Gently reheat in a skillet to revive the seared edges and wilt the spinach once more.
Final notes
This garlic chicken and gnocchi recipe brings joy to busy nights and showcases how simple elements combine into something special. It is a reminder that cooking, recipes, bon apetit moments do not need to be complicated to be delightful. Happy cooking and enjoy every flavorful bite.
This article was created from the video Garlic Chicken and Gnocchi with the help of AI.
Bonnie’s Cantonese Filet-O-Fish: A Homemade Twist — cooking, recipes, bon apetit
Bright idea: a Cantonese-inspired fast-food classic
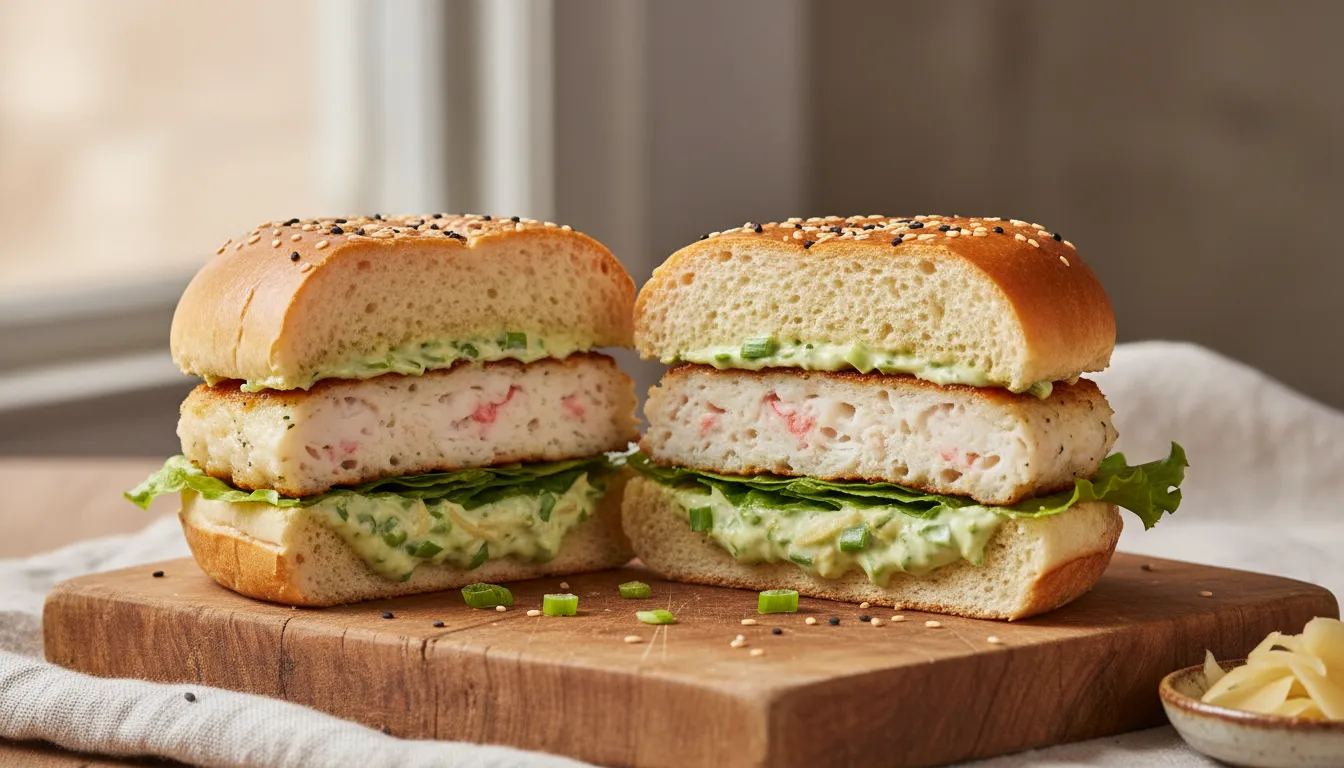
This happy, savory sandwich reimagines a beloved fast-food favorite with Cantonese flavors at the forefront. The goal is simple: keep the familiar build — bun, patty, tartar — but swap the bland, frozen fillet for a bouncy cod-and-shrimp fish cake and a tangy ginger-scallion tartar. It’s a fun, approachable recipe that delivers on texture and punchy seasoning, perfect for anyone who loves cooking, recipes, bon apetit style twists.
What makes this different
Instead of using a plain flake fish slab, this version uses an emulsified fish-and-shrimp paste to create a springy, chewy fish cake reminiscent of Cantonese fish cakes. Garlic chives, ginger, sesame oil, and a small amount of lard give the patty savory depth. The tartar sauce centers on a ginger-scallion base brightened with pickled mustard greens and lemon zest so every fried bite gets a zippy lift.
Ingredients
- For the patties – 1 lb cod (tail pieces work great), 12 oz peeled shrimp, garlic chives, ginger, cornstarch, lard, sesame oil, salt, sugar, MSG, white pepper.
- For the tartar-ginger sauce – mayo, ginger-scallion oil (scallions, ginger, garlic, neutral oil), pickled mustard greens, chopped pickles, lemon zest and juice, cilantro, salt, MSG.
- For assembly – soft potato rolls, full slice American-style cheese, coarse panko, eggs, cornstarch for breading, neutral frying oil.
Step-by-step method
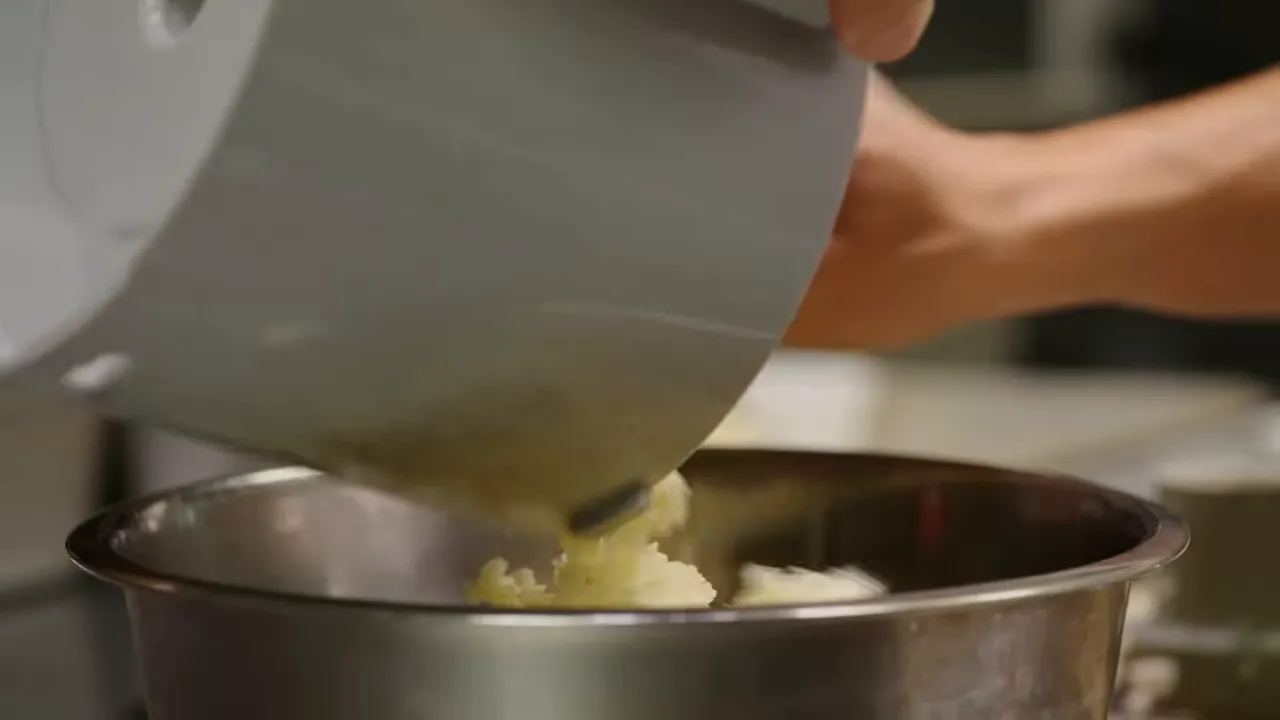
1. Make the fish-and-shrimp paste
- Cut cod and shrimp into chunks and blitz in a food processor until very tacky and slightly sticky. Overworking is good here to develop that springy texture.
- Add chopped garlic chives, grated ginger, cornstarch, a touch of lard, sesame oil, salt, sugar, MSG, and white pepper. Pulse until fully combined into a smooth paste.
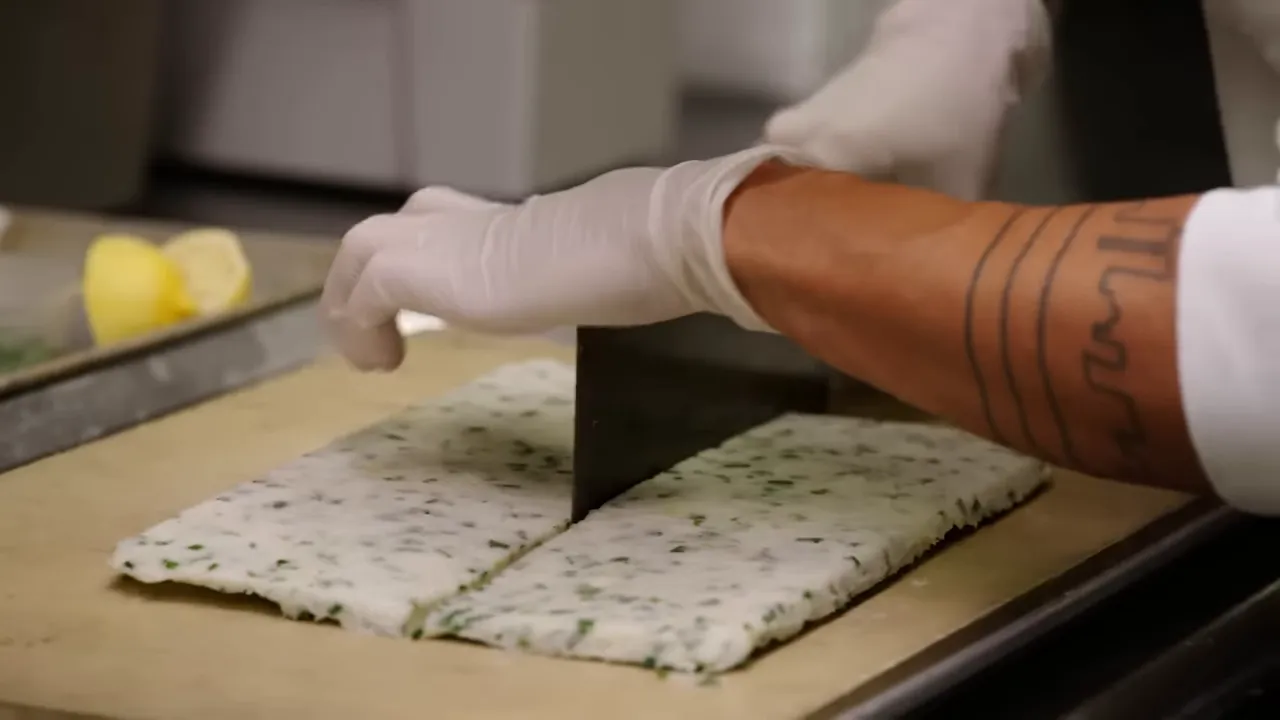
- Press the paste into a flat pan, freeze briefly until firm enough to portion, then cut into 2x5-inch patties.
2. Build the ginger-scallion tartar
- Thinly slice scallions, coin ginger and garlic, and season lightly with salt.
- Heat neutral oil to nearly smoking and pour over the aromatics to release aroma and color. Let cool, strain the oil if needed, and fold in chopped pickled mustard greens and pickles.
- Whisk into mayo, add lemon zest, a squeeze of juice, chopped cilantro, salt, and MSG to taste.
3. Breading, frying, and assembly
- Set up dry (cornstarch), wet (egg), dry (coarse panko) breading. Coat patties and deep-fry until golden and crunchy, roughly 3–5 minutes depending on thickness.
- Spread mayo on potato rolls, toast lightly to stay pillowy. Place a full slice of cheese on the bottom bun so the hot patty melts it into gooey perfection.
- Top with a generous spoonful of the ginger-scallion tartar and finish with the top bun. Pack if taking to go.

Tips for success
- Texture matters — blitz the fish and shrimp until tacky. That overworked protein is what gives the fish cake its bounce.
- Panko crunch — use very coarse panko to create a contrast between soft fish cake and an assertive crust.
- Balance the sauce — the tartar should be bright and acidic so it cuts through the fried coating; pickled mustard greens add great tang and texture.
- Make ahead — freeze formed patties on a sheet pan so you can bread and fry straight from chilled for even results.
- This recipe is an excellent example for anyone exploring cooking, recipes, bon apetit style home projects—playful, bold, and satisfying.
Storage, serving, and pairing
Assembled sandwiches are best eaten hot. Uncooked patties keep well frozen for a month. Reheat fried patties in a 350°F oven to restore crispness. Serve with fries or a crisp cabbage slaw to add freshness and crunch.
A final tasty thought
This Cantonese-inspired fish sandwich proves that small swaps — a shrimp-kissed fish cake, ginger-scallion tartar, and a full slice of melty cheese — can turn fast-food nostalgia into something bright and savory. It’s playful, practical, and ideal for cooks who love experimenting with cooking, recipes, bon apetit influences in the home kitchen. Try it, tweak it, and enjoy the cheerful crunch.
This article was created from the video How a Pro Chef Makes a Cantonese-Inspired McDonald's Filet-O-Fish | The Special | Bon Appétit with the help of AI.
Seafood Classics: Cooking, Easy Recipes for Crab Linguini, Mussels, Scallops & More
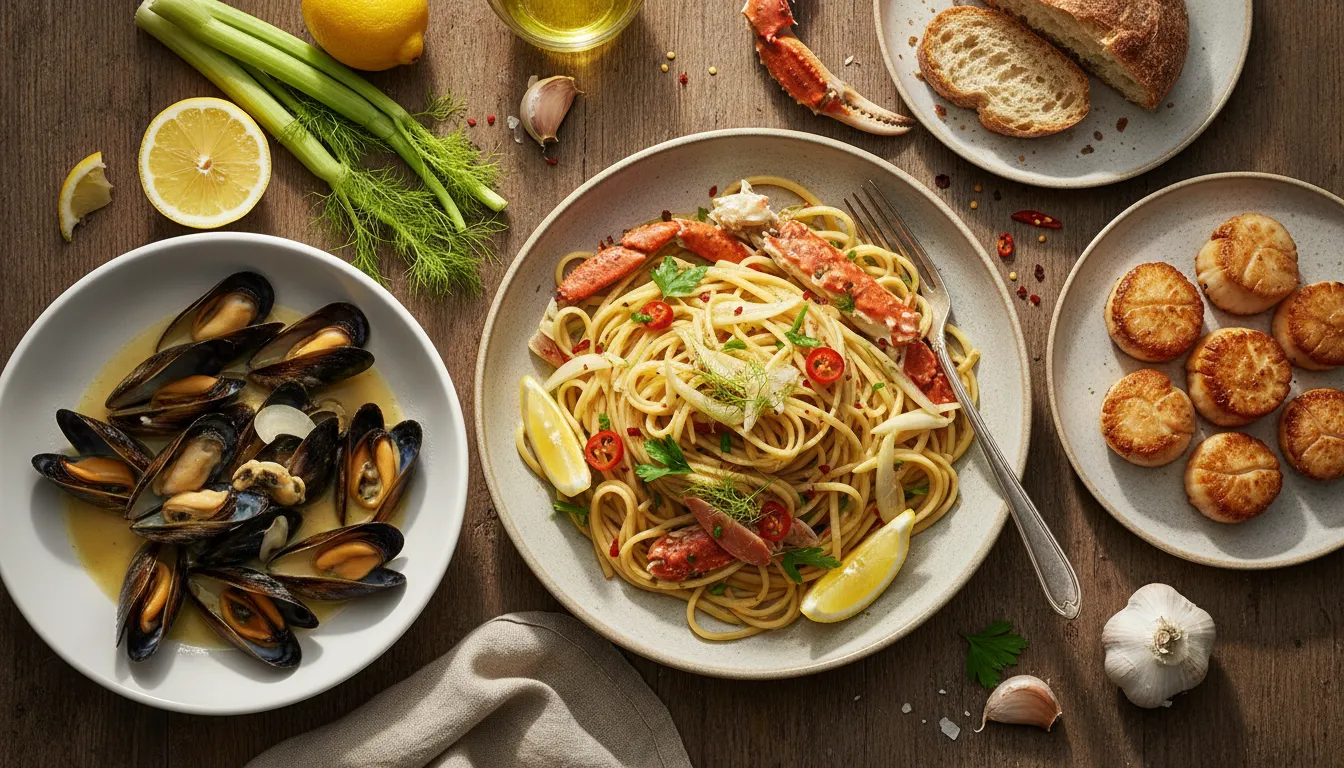
Bright, joyful seafood dishes make weeknights and weekends feel special. This collection of cooking, easy recipes gathers simple techniques and bold flavours so anyone can serve elegant plates without fuss. Each recipe focuses on freshness, quick steps and small tips that deliver maximum flavour — perfect for cooks who love delicious results with minimal stress.
Crab Linguini with Fennel, Lemon and Chili
This is a light, fragrant pasta that celebrates crab. The trick is to use the crab cooking water to season the pasta, and to balance delicate brown crab meat with lemon, fennel and a soft hit of chili.
Ingredients (serves 2–3)
- Whole crab (or 300–400g cooked white and brown crab meat)
- 1 small fennel, very thinly sliced
- 1 lemon zest and juice
- 1 deseeded red chilli, finely sliced
- Small bunch parsley, finely chopped
- 80–100g linguine per person
- 8 tbsp extra virgin olive oil, salt
Method
- Make a fragrant crab bath: simmer crab shells with fennel tops, herbs, a slice of lemon, a little chilli and salt. Gently cook for 10 minutes, then remove the crab to cool.
- Use the flavoured water to cook the linguine until just underdone so it will finish in the sauce.
- Pick out the brown meat (full of flavour) and the white meat. For brown meat use a pestle and spoon to coax it out of the shell if needed.
- Mix thinly sliced fennel, lemon zest and juice, parsley, olive oil and chilli in a bowl; let this warm slightly on the pot so the flavours soften.
- Toss the linguine with the brown meat first, then fold in the white meat and the fennel dressing. Finish with a drizzle of olive oil and extra lemon if needed.
Tips
- Keep some shell fragments for stock; little things add depth.
- Serve with silence and a big smile — this one loves to be eaten slowly.
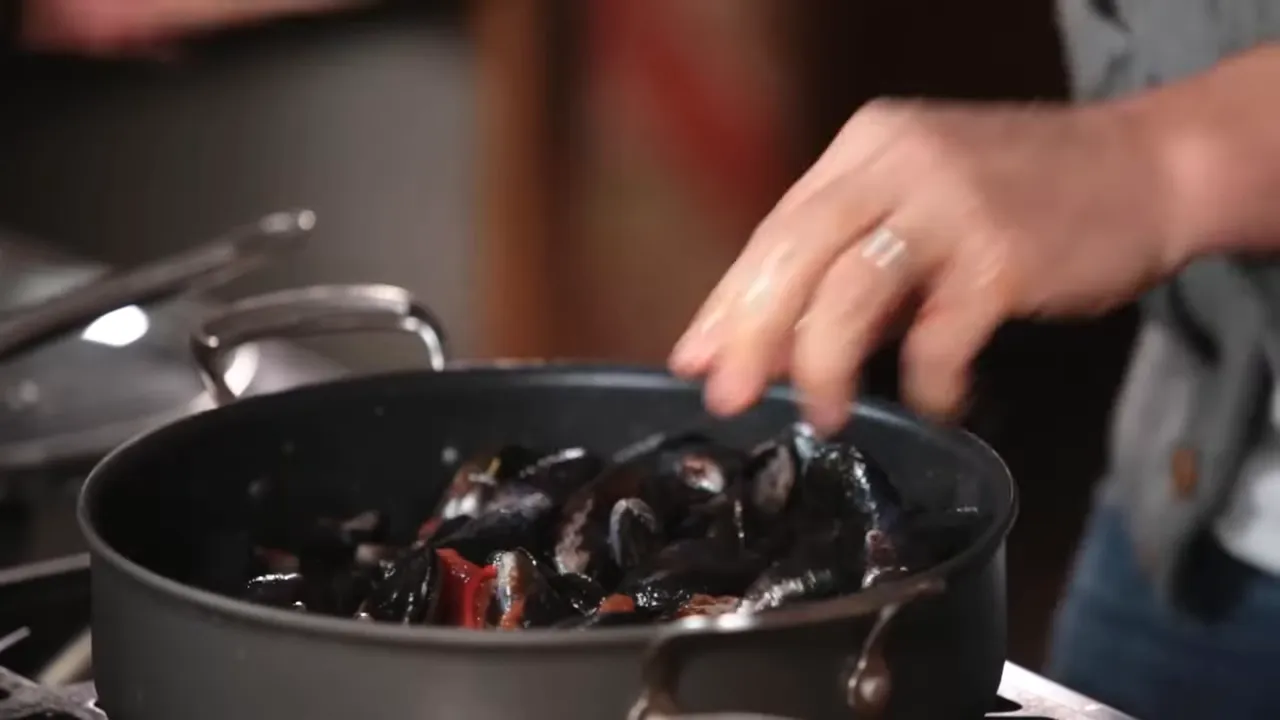
Angry Mussels Arabiata with Toast and Spaghetti
Mussels cook in minutes and soak up big, spicy tomato flavours. This version goes with crusty toast that soaks up the juices, and spaghetti that mops up the sauce beautifully.
Quick method
- Sweat sliced chilli in olive oil from cold to hot to release sweet spice. Add sliced garlic and a sprig of rosemary.
- Add a splash of white wine, then crushed plum tomatoes by hand for a rustic texture.
- Add cleaned mussels, lid on, and cook 4 minutes until they open.
- Toast bread, rub with garlic, pile on the mussels and spoon over the broth. Toss cooked spaghetti in the remaining broth for a saucy finish.
Seared Scallops with Crispy Bacon and Sage
Diver caught scallops deserve slow, focused attention. Crisp smoked bacon and fried sage leaves add texture and savoury contrast to the sweet, tender scallops.
Essentials
- Scallops — remove skirt and roe if preferred
- Smoked bacon diced into lardons
- Sage leaves, butter, lemon
Cook
- Fry the bacon until golden, push to one side and crisp the sage in the hot fat until it crackles.
- Add a knob of butter, season lightly, place scallops cut side down and sear mostly on that side for caramelisation, flip briefly to finish.
- Finish with a squeeze of lemon and serve over buttery mash or a simple green salad.
Bacon-Wrapped Skewered Prawns with Watermelon Feta Salad
This is sunshine on a skewer. The smoky bacon protects prawns on the grill while the watermelon salad refreshes the plate. It’s brilliant for barbecues and easy to scale up.
Salad ingredients
- Watermelon cut into mouth-sized cubes
- Feta sliced or crumbled
- Cucumber, thinly sliced
- Red onion, finely sliced
- Extra virgin olive oil, lemon, red chilli, mixed herbs
Skewers
- Butterfly and marinate prawns in lemon zest, lemon juice, smashed garlic, chopped herbs and olive oil for 30 minutes or a quick turn if short on time.
- Weave smoky bacon or pancetta onto skewers with prawns so the bacon crisps while keeping prawns tender. Grill 3–4 minutes per side depending on heat.
- Serve with the bright watermelon salad and a wedge of lemon.
Prawn Toast: A Quick Crunchy Treat
Prawn toast is a family favourite mashup — crunchy sesame, fragrant ginger and bright dipping sauce. It’s quick, playful and perfect for sharing.

How to make
- Dice prawns and combine with grated ginger, sliced spring onions, a splash of soy and an egg white to bind.
- Spread the mix on 1cm slices of bread, press into beaten egg whites and coat each side with sesame seeds.
- Fry in a non-stick pan on medium heat until golden and crisp, about 3 minutes per side. Serve with chilli dipping sauce.
Helpful Notes and Smart Tips
- Timing matters. Most shellfish cook in minutes. Prep ingredients first so nothing overcooks.
- Use cooking liquid. The water used to cook crab or mussels is flavour gold for pasta and rice.
- Freshness and sustainability. Choose sustainable prawns and shellfish when possible for the best flavour and ethics.
- Simple swaps. Leftover grains, crusty bread or plain rice all love seafood juices and make great bases.
Why these dishes work
Each recipe is built around contrast: sweet shellfish versus bright acid, crunchy elements versus silky textures, and quick high-heat cooking that locks in flavour. They are perfect examples of cooking, easy recipes that feel luxurious but are genuinely approachable.
Try one this week and enjoy the happiness that comes from simple, well-cooked seafood shared around the table.
This article was created from the video Seafood Recipes & Ideas By Jamie Oliver with the help of AI.
Katy Perry's Cherry Pie — A Joyful Take on cooking, easy recipes
Sweet, a little cheeky, and wonderfully simple, this cherry pie recipe blends classic baking with playful pop-culture charm. Perfect for anyone who loves cooking, easy recipes that deliver big flavor without fuss, the pie celebrates ripe cherries, buttery crust, and a meditative moment in the kitchen.
Best Cherry Pie Recipe
This version keeps things approachable while highlighting bright cherry flavor. It works for bakers of all levels and makes a stunning centerpiece for a dessert table or a cozy weekend treat. The method focuses on balance: juicy filling, the right amount of sugar, and a crust that snaps just right.
Ingredients
- Fresh or frozen cherries – about 6 cups, pitted
- Granulated sugar – 1 to 1 1/4 cups, depending on cherry sweetness
- Cornstarch – 3 to 4 tablespoons to thicken
- Lemon juice – 1 tablespoon
- Vanilla extract – 1 teaspoon
- Salt – pinch
- Pie crust – double crust (homemade or store-bought)
- Egg wash – 1 egg beaten with 1 tablespoon water
How to Make the Cherry Pie
- Preheat the oven to 400°F (200°C).
- In a large bowl, combine cherries, sugar, cornstarch, lemon juice, vanilla, and a pinch of salt. Toss gently until well coated.
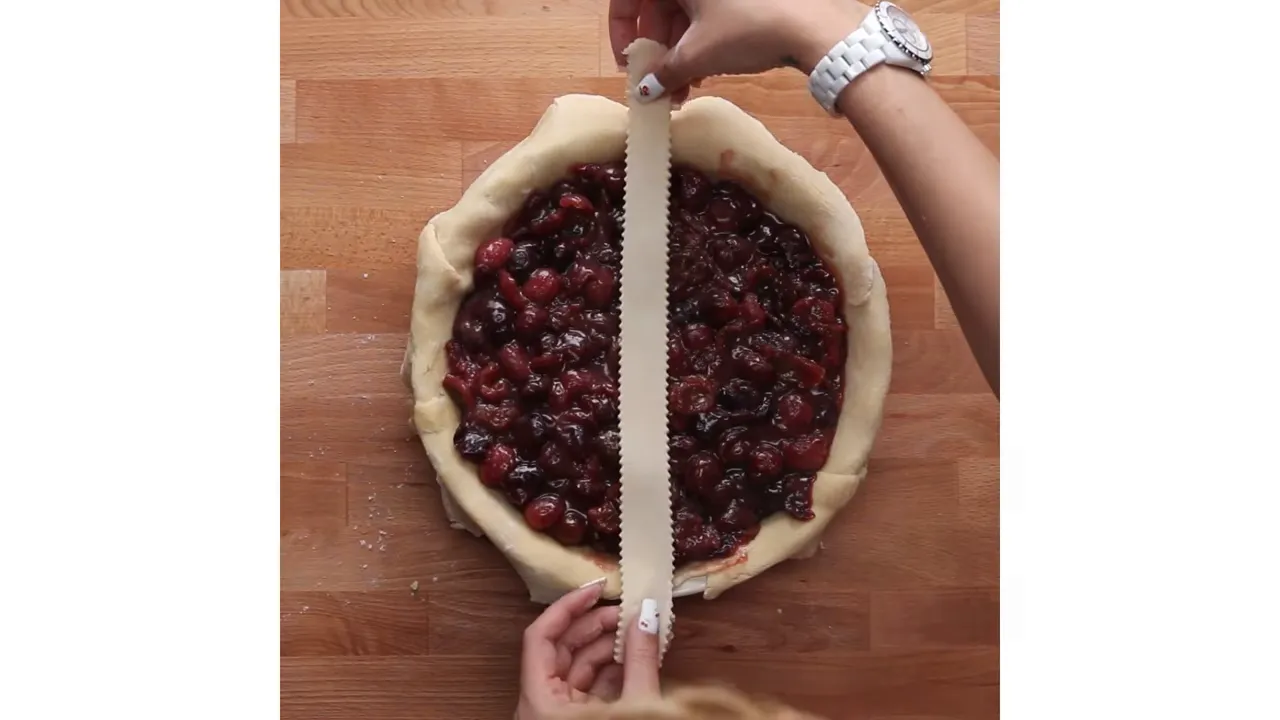
- Roll out the bottom crust and fit it into a 9-inch pie dish. Spoon the cherry filling into the crust, spreading evenly. Don’t forget the middle—make sure the filling is centered and level.
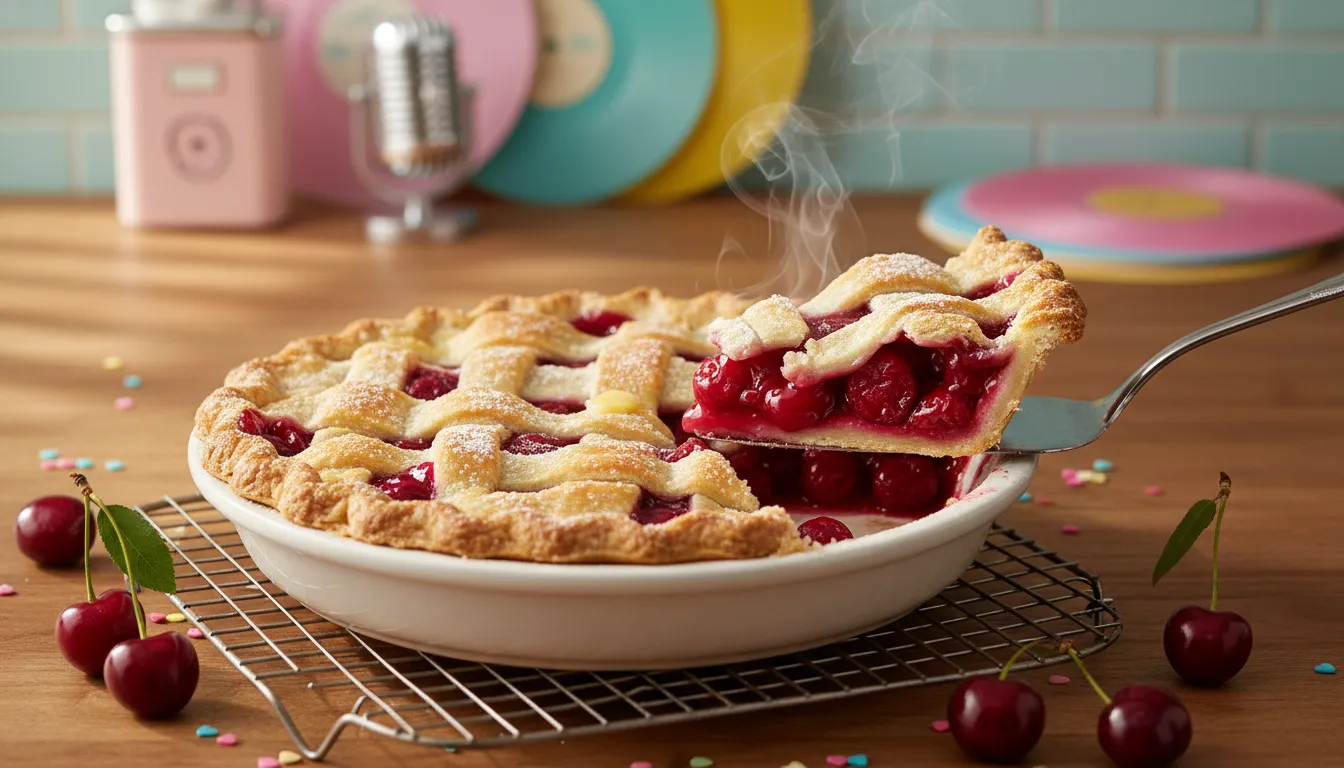
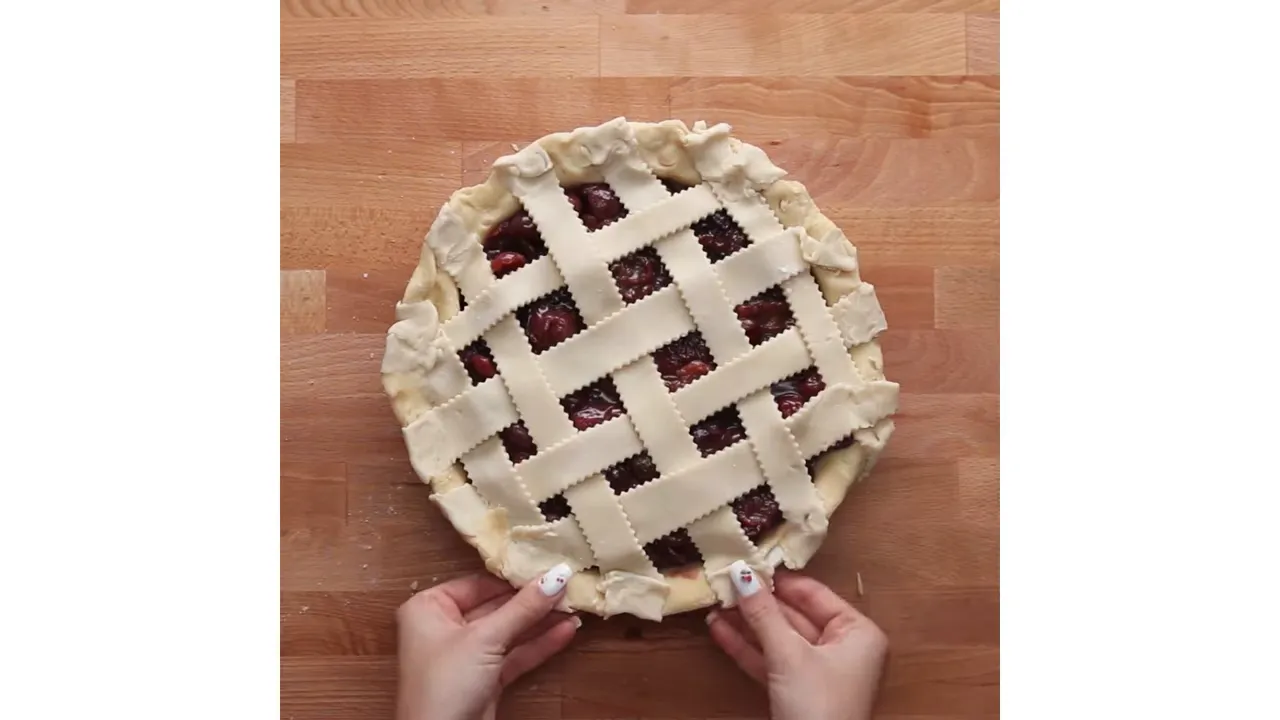
- Top with the second crust. Cut vents or create a lattice for a golden finish. Brush with egg wash and sprinkle a touch of sugar for sparkle.
- Bake at 400°F for 20 minutes, then reduce heat to 350°F and bake an additional 30 to 35 minutes until the crust is golden and filling bubbles.
- Let cool at least 2 hours so the filling sets. Slice and serve with whipped cream or vanilla ice cream.
Making a good meal connects all of us.
Expert Tips and Tricks
- Adjust sweetness. Taste your cherries first. If they are very sweet, reduce sugar to keep the pie balanced.
- Prevent a soggy bottom. Blind bake the bottom crust for 7 minutes if using very juicy cherries or add a thin layer of finely ground almonds to absorb excess juice.
- Thicken carefully. Start with 3 tablespoons cornstarch and add a bit more only if needed; over-thickening can give a gummy texture.
- Make it ahead. The pie keeps well and slicing improves after chilling. This makes it a fantastic choice for gatherings.
- For bakers who love simple wins, this recipe joins a collection of cooking, easy recipes that celebrate flavor with minimal stress.
Serving and Storage
Serve slightly warm with ice cream or whipped cream. Store covered at room temperature for up to one day, or refrigerate for 3 to 4 days. Reheat gently to refresh the crisp crust.
Why This Pie Delights
This cherry pie is playful, comforting, and approachable. It combines bright fruit, a buttery snap, and a joyful kitchen ritual. Whether made for friends or a quiet night in, it proves that cooking, easy recipes can still feel special and celebratory.
This article was created from the video Katy Perry's Cherry Pie! with the help of AI.
Easy Mini Cheesecakes Recipe — cooking, recipes, bon apetit
Key takeaways
These mini cheesecakes are quick, creamy, and endlessly adaptable. Perfect for parties, make-ahead desserts, or a sweet afternoon treat. They bring together a crunchy pecan graham crust and a silky cream cheese filling with minimal fuss for maximum joy. This is a delightful addition to any list of cooking, recipes, bon apetit inspirations.
Why these mini cheesecakes work
Mini cheesecakes pack all the flavor of a full-size cheesecake into a bite-sized package. They bake quickly, chill fast, and serve beautifully. The recipe balances richness with a touch of tang from sour cream, while the toasted pecan-graham crust adds crunch and warm flavor. Whether for a crowd or a cozy dessert moment, these are a simple way to celebrate cooking, recipes, bon apetit pleasures.
Ingredients (makes 12 mini cheesecakes)
- Crust: 1/4 cup toasted pecans (30 g), 8 full graham cracker sheets (135 g), 3 tablespoons granulated sugar, 1/2 teaspoon cinnamon, ~4.5 tablespoons melted butter
- Filling: 2 packages cream cheese (16 oz total, 452 g), 1/2 cup granulated sugar (100 g), 1/4 teaspoon salt, 1/4 cup sour cream (60 g), 1 1/2 teaspoons vanilla, 2 large eggs (room temperature)
- Optional: up to 1 teaspoon lemon juice, toppings like whipped cream, berries, caramel, ganache, or fruit compotes
Step-by-step: From crust to creamy top
1. Prep and toast
Preheat the oven to 350°F. Toast the pecans on a rimmed baking sheet at 350°F for about 8 minutes, stirring halfway, until fragrant. Toasting really lifts their flavor and adds satisfying crunch to the crust.
2. Make the crust
Pulse the toasted pecans and graham crackers together until finely broken. Add 3 tablespoons sugar and 1/2 teaspoon cinnamon and pulse again to combine. Drizzle in about 4.5 tablespoons melted butter and pulse until the mixture holds together when squeezed.
If a food processor is not available, finely chop the pecans and crush graham crackers in a bag, then mix by hand. Press about 2 tablespoons of the crust mixture into each cupcake liner using a shot glass or a flat-bottomed tool to create a compact base. Bake the crusts for 8 to 10 minutes at 350°F until slightly colored and fragrant.
3. Mix the filling
Use room-temperature cream cheese for a lump-free filling. Beat the two packages of cream cheese on medium speed for 2 to 3 minutes until smooth. Add 1/2 cup sugar and 1/4 teaspoon salt, mix another minute, then stir in 1/4 cup sour cream and 1 1/2 teaspoons vanilla on medium-low for about 2 minutes.
Add the eggs one at a time, mixing gently until fully incorporated. For brightness, up to 1 teaspoon lemon juice can be added at this stage, though it is optional.
4. Bake and finish
Divide the batter into each prepared crust, about 1/4 cup per cup (slightly under). Bake mini cheesecakes at 350°F for 15 to 17 minutes, or until they are puffed and the centers jiggle slightly when nudged. Let them cool completely at room temperature, then chill if a firmer texture is desired.
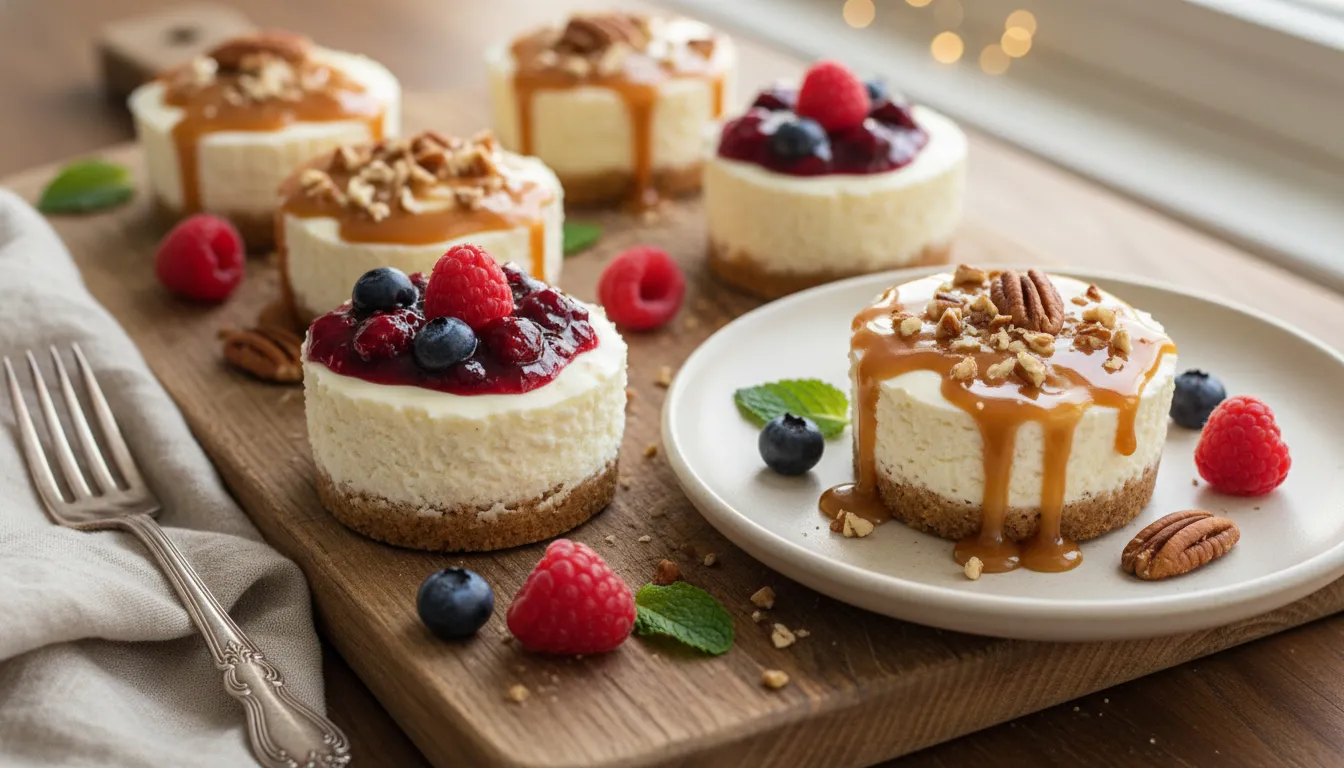
Toppings, flavor variations, and personalization
These mini cheesecakes are a blank canvas. Popular choices include:
- Fresh berries and whipped cream for brightness and color.
- Warm caramel or salted caramel drizzle for indulgence.
- Chocolate ganache for a rich, elegant finish.
- Fruit compotes like cherry, lemon curd, or apple pie filling for a homestyle touch.
For a nut-free crust, swap the pecans for extra graham crackers or use an Oreo crust. Flavor the batter by folding in melted chocolate, blueberries, or a swirl of caramel—note that add-ins will increase the total batter volume and may yield more than 12 minis.
Storage and make-ahead tips
Refrigerate finished mini cheesecakes for up to 3 days. Freeze them for up to 3 months; thaw in the refrigerator for 12 hours before serving. Doubling the recipe and keeping extras in the freezer makes entertaining effortless—great for quick desserts at unexpected gatherings.
Simplify and succeed
A few small tricks ensure perfect results every time:
- Room-temperature cream cheese means silky batter with no lumps.
- Finely chopped nuts give a better texture for the crust.
- Press the crust firmly so it forms a stable base without needing to reach the sides of the liner.
- Watch the centers—they should still jiggle slightly when done to avoid overbaking.
These tips make the process a joyful part of cooking, recipes, bon apetit routines and help take any baker from good to great.
Final notes
Mini cheesecakes are indulgent, adorable, and forgiving. They deliver big flavor without the long bake and chill time of a full-size cheesecake. Whether kept simple with whipped cream and berries or dressed up with caramel and ganache, these treats are a reliable win for gatherings, gifts, or everyday sweet moments inspired by cooking, recipes, bon apetit creativity.
This article was created from the video Easy Mini Cheesecakes Recipe with the help of AI.

